
A peek behind the scenes… part 1

Table saw, workbench, router table, drill and bandsaw.
My workspace is likely much like that of many other amateur wood workers - practical and functional.
As part of this series I wanted take you on a tour of sorts, photos with some commentary. What I show and share has not happened over night, it has taken me over 3 years to reach “this point”. All these things needed to be in place before I could begin making anything.
Show is the interior of my small sound insulated, stand alone workshop, 12ftx12ft. The walls you will notice are free of any shelves and hanging things… this became a necessary trade with the sound proofing aspects, that resulted in a complex interior wall/floor/roof system.
In my living space I have dedicated area to do everything else I need to - product photos, build any electronics and do most of the final assembly, especially the parts that involve paper. All the creative aspects also happen in this space. I get to let things unfold and evolve, an opportunity to see things on a daily basis with a rested mind and fresh set of eyes, call this the ageing part when the rough designs become more refined over a great length of time until they are ready to be made in small batches as time allows… I have a full time job to keep a roof over my head and food on the table. In time I hope to be fortunate enough to be able to make ends meet, doing what I love.

The dual “SuperVac” showing the cyclones and bucket dust windows | One of two roaming quick release magnetic dust collection flanges

My “Supervac” - a dual, near silent, canister filter+cyclone equipped dust collection system built from the ground up, for my air tight workspace.
As this space is completely air tight for sound proofing reasons, I had a significant number of challenges to overcome in order to ensure a dust free environment.
I ended up not being able to use any off-the-shelf dust collectors. Instead I had to build my own and make it as efficient as possible, and quiet. Since I am using high performance vacuum cleaner motors, not typically suitable for dust collection, I had to do extensive modifying of each piece of equipment in order to dramatically improve dust collection efficiency - standard equipment forces you to throw a huge dust collector system at it in order to overcome all the inefficiencies.
Above and to the right is the result. Not shown however is the extensive modifications I made to each piece of equipment, from the table saw to the jointer, to my small chop saw, to my bandsaw and more.
I call my dust collector my “Supervac” as it is in essence a dual vacuum cleaner. When used on the table saw, one pulls dust from the blade inside a closed housing I put inside the cabinet and the other from the dust hood you see above the blade. The planer and jointer use both vacuum cleaners at the same time too in order to ensure there is adequate volume of chips removed. I still have to be mindful of how much I take off with each pass as it can still overwhelm both units - mostly at the cyclone mouth into the buckets.
All in all I’m happy with the result, but during summer I am only able to work for limited periods as the “Supervac” heats up the interior air really fast. During winter it’s more welcome since the space is unheated.

Sliding thin strip jig used to make all the material I use in the frames, both the main body frames and decorative frames.
I have several of these sliding jigs set to preset thicknesses, they slide along the fence and allow me to safely hold and cut all my frame pieces. The material is first planned to the right thickness, 14mm, 12mm, 8mm and 7mm mostly and is typically 100mm wide and 300mm long. The blade is set to the precise height so it just cuts through the material and into the base of this jig a tiny bit. The fence is adjusted for the other dimension required, so if 7mm X 4mm is required, 7mm material is used and the fence is adjusted to 4.2mm in order to allow me enough tolerance to hand plane the final bit and get the finish I want with a final size of 4mm.

Precisely sized material, all hand-planed ready for the next stages | My “thicknessing” jig with various channels and removable shims.
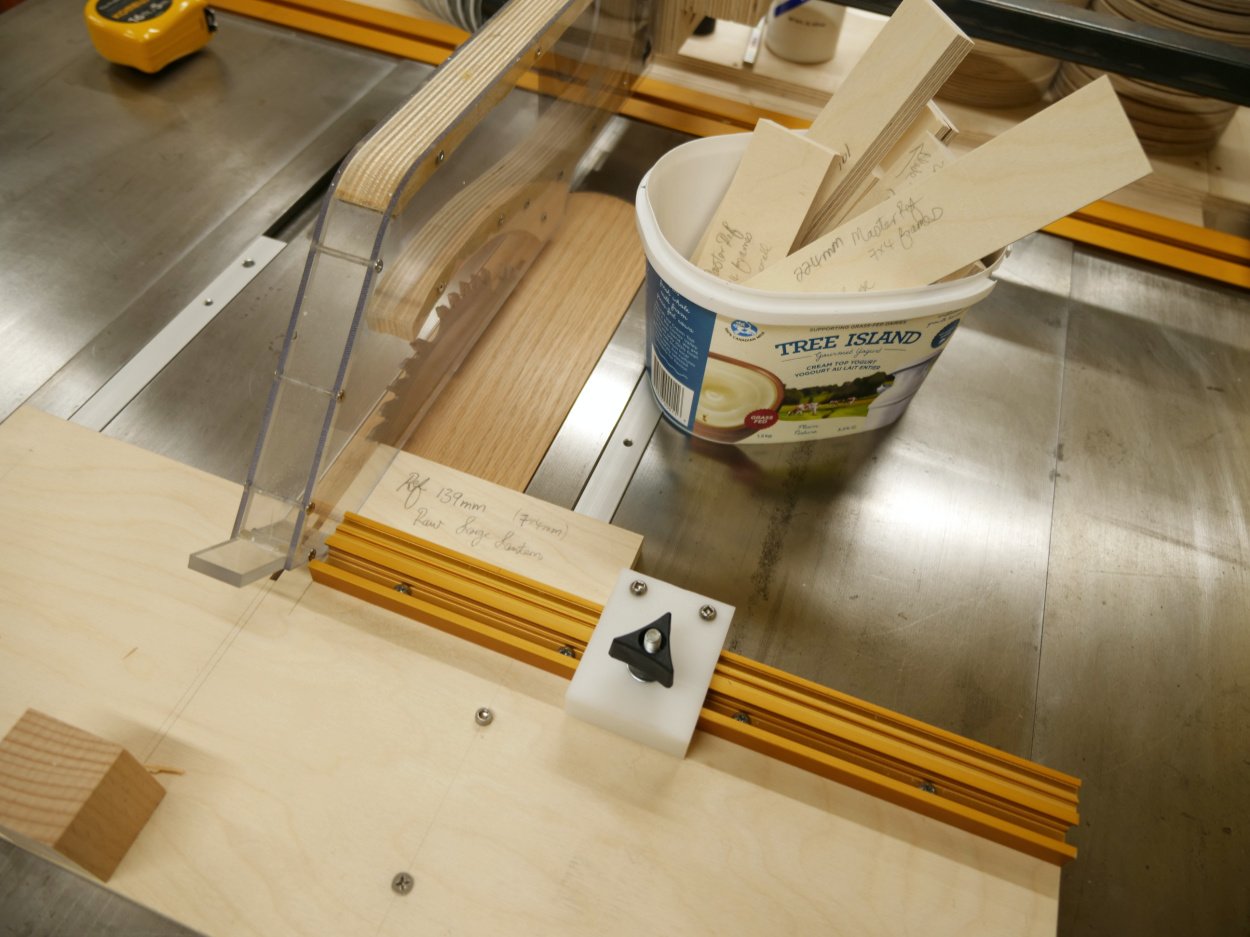
Table saw with pre-cut templates to cut strips to precise length without measuring.
All my lantern frames are hand planed and finished that way, there is no sanding. This single aspect takes a great deal of time and care and I am still learning how to become more proficient at it.
The picture above and to the left shows a mix of ready to use material and material that just requires the final finishing of a plane. It’s not always a good thing to size things precisely and then let it sit, so I have learned anyway.
The picture directly above shows part of my thicknessing jig with removable shims and some slots sized for the two small block planes I have, and not shown are wider slots that use a bigger hand plane. I have found I end up using the block planes almost exclusively, they are easier to work with and just offer great feedback vs a larger hand plane. Show above too are the 7x4mm strips I use to make the decorative frames. In this case cherry is the wood you see being used.
Once the wood is the correct thickness I cut it to length on the table saw with another jig - I have pre-cut templates… pieces of baltic birch ply cut to precise lengths that act as a spacer to adjust my sliding stop, so these template sit between the blade and the stop. This way I don’t need to measure anything, I take out the right template, adjust and am ready to cut. This jig is shown to the left here. In the yogurt container, one of many, is a set of templates cut for a specific lantern, all kept together.

Ready to assemble frame pieces on the left - using the ref template | A frame in the initial stages of assembly, test dry fit before glue-up.
The final frame beginning to take shape…
Once the glue squeeze-out is cleaned up, the frames are left to dry for about 24hrs. The final steps involved flush cutting the outer frame and carefully leveling each cut with a razor sharp chisel.
Any further hair sizing is done with a block plane to ensure a snug fit into the final lantern or lamp. At this stage the paper is also applied to the frame and misted if necessary to remove any wrinkles or creases.
In the next part of this series we will take a look at some of the other tasks that unfold in my “creative” space, so please be sure to follow along by signing up for my newsletter which will give you a heads up of anything new unfolding.
In the coming blog posts I will also delve into all the wonderful papers on offer and share some early previews of the three new lantern and lamp collection I am working on, as well as new accessories that bring added functionality - tarrot card holders, crystal shelves/dishes, elegant paper holders which enable you to create daily reminders illuminated by your lantern or lamp and more...
Thank you for being a part of my journey. Please comment or ask questions below.

Freshly assembled frames, next steps include cleaning up glue before it fully dries, then flush cutting the ends.